Proper foil balloons deflation matters. Doing it the right way keeps you and others safe, preserves the balloon for reuse, and makes eco-friendly balloon disposal easier. Below is a clear, SEO-friendly, step-by-step guide on how to deflate foil balloons (also called aluminum or Mylar balloons), with practical tips, quick methods, and recycling ideas.
Why deflate foil balloons properly?
Incorrect deflation can tear the balloon, ruin the valve, or create sharp fragments that are hard to dispose of. Proper deflation:
Makes balloons reusable (saving cost).
Reduces the volume for easier storage or recycling.
Lowers the risk of accidental punctures or choking hazards for children and pets.
Supports eco-conscious disposal by enabling repurposing or correct waste sorting.
1. Essential tools for deflating foil balloons
Keep these on hand for safe, efficient deflation:
Plastic straw (recommended): 3–5 mm diameter, 10–15 cm length. Thin enough to fit the valve but sturdy enough to push through the seal.
Do not use metal straws — they can scratch or puncture the balloon.
Plastic tweezers or rounded cotton swabs: for gently prying open a stuck valve.
Soft cloth: to clean dust from the valve and straw before inserting.
Sealable plastic bag or storage pouch: to keep flattened balloons protected for reuse.
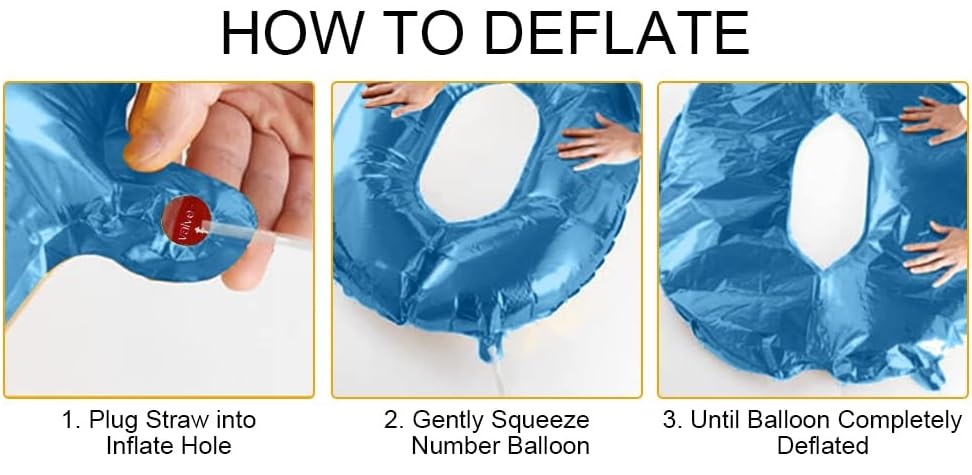
2. Proper deflation procedure (step-by-step)
Follow these steps for consistent results when learning how to deflate foil balloons:
Find the valve — most foil balloons have a long self-sealing valve at the bottom or side. Remove any hanging ribbon or string.
Clean the valve — wipe away dust with a soft cloth; this prevents dirt getting inside the valve.
Open the valve gently — pull back the two foil layers around the valve to expose the opening.
Insert the straw — push the plastic straw slowly into the valve about 3–5 cm until you feel it pass the seal. If you meet resistance, twist the straw gently while pushing.
Release the air — allow air to escape naturally. Use your free hand to press the balloon from the top toward the valve (not toward seams or raised features) to guide air out evenly.
Remove the straw and seal — when most air is out, withdraw the straw and pinch the valve to close it. Fold the balloon, place it in a sealed bag, and store in a cool, dry place.
Safety note: when deflating helium balloons, point the valve away from your face and people nearby — helium escapes quickly and could surprise someone.
3. Techniques for self-sealing valves
Different valve conditions require slightly different approaches:
Minor adhesion (lightly stuck valve): Peel back the foil a little and insert the straw directly.
Tight adhesion: Use the rounded end of plastic tweezers or a cotton swab to pry a small gap, insert the straw, then remove the tool.
Cracked or flaky edges: Find an intact area of the valve to insert the straw. Avoid pressing on cracked sections to prevent further tearing.
4. Quick deflating methods (when you’re short on time)
Layered pressing: Lay the balloon flat on a smooth surface and press gently from the top toward the valve. This is typically 2–3× faster than letting it air-escape without assistance.
Double-straw method: For balloons larger than 18 inches, insert two straws spaced a few centimeters apart; squeeze the sides with both hands to speed airflow. This roughly doubles deflation speed while remaining controlled.
Work in stages: For very large or stubborn balloons, partially deflate, fold, then repeat — this reduces stress on seams and prevents cracking.
5. Preventing cracks, tears, and damage
Never use sharp tools (toothpicks, scissors, knives) — they’ll puncture the foil.
Avoid pressing on seam lines or embossed areas; press smooth flat surfaces instead.
Choose a cool, shaded workspace — high temperatures or direct sun weaken foil and glue.
If the straw gets stuck, don’t yank. Gently wiggle and twist the straw to free it; pulling hard can tear the valve.
Supervise children — deflation tools and small parts can pose a choking hazard.
6. Reuse, craft ideas, and recycling
Reuse (recommended):
After deflation, pinch the valve closed, fold the balloon neatly, and store in a sealed bag in a cool, dry place. With careful handling most foil balloons can be reused 2–5 times depending on size and condition.
Creative repurposing:
Cut clean sections into decorative pendants, mini storage pouches, or craft shapes for parties and DIY projects.
Use small, soft pieces as stuffing for pet toys (ensure no small choking pieces remain).
Recycling / disposal:
Foil balloons are usually made from metallized nylon (often called “Mylar”), which is not accepted in all curbside recycling programs. Check local recycling rules.
If the valve or balloon is badly damaged and cannot be reused, cut it into small pieces and dispose according to local waste guidelines (recyclable or general waste as required).
7. FAQ — quick answers
Q: Can I deflate foil balloons without a straw?
A: Yes, but using a straw gives better control and reduces the risk of tearing. Alternatives (very gently pinching a tiny opening) are less reliable and can damage the balloon.
Q: How many times can I reuse foil balloons?
A: Typically 2–5 times with careful deflation, storage, and limited exposure to heat or rough handling.
Q: Are foil balloons recyclable everywhere?
A: No — recycling rules vary. Contact your local waste authority or recycling center to confirm. Reuse or creative repurposing is usually the most eco-friendly option.
Conclusion
Mastering how to deflate foil balloons is simple: use the right tools (a small plastic straw), follow controlled steps, avoid sharp instruments, and store or repurpose the balloon for future use. Proper deflation saves money, reduces waste, and keeps everyone safer.

 How a Professional Purchasing Sheet Protects Your Foil Balloon Margins (And Why Most Buyers Fail)
 Why the Cheapest Balloon Quote Is Often Your Most Expensive Sourcing Mistake
 Why Balloon Prices Look So Confusing — And What Buyers Should Really Compare
 Why Balloon Buyers Must Lock In Valentine’s Orders in December — Not January